
记一次短信盗刷问题的解决方案
来源: CSDN
编辑:刘光昕
- 目录
- 一、图形验证码增加识别难度
-
- 1.1自定义图形验证码
- 1.2使用kaptcha验证码组件
-
- 二、针对ip进行访问次数限制
-
- 2.1获取真实的IP地址
- 2.2设置访问限制
-
前言
最近公司的注册接口经常在半夜被恶意访问,从而引发短信盗刷事件,原本在手机号等参数校验通过后,注册接口会对图形验证码进行正确性校验,校验通过后再进行短信发送。通过短信发送记录发现我们的图形验证码很容易就被识别了,没有起到安全过滤的作用,同时对短信发送次数没有进行上限设置,所以这此短信盗刷问题我们做了以下解决方案。
一、图形验证码增加识别难度
1.1自定义图形验证码
我们需要实现一个生成图形验证码的工具类VerifyCodeImageUtil.java
import java.awt.Color;
import java.awt.Font;
import java.awt.Graphics;
import java.awt.Graphics2D;
import java.awt.RenderingHints;
import java.awt.geom.AffineTransform;
import java.awt.image.BufferedImage;
import java.io.IOException;
import java.util.Arrays;
import java.util.Random;
public class VerifyCodeImageUtil {
//去除I、l、1、0、o、O这这些容易混淆的字符
public static final String VERIFY_CODES = "23456789ABCDEFGHJKMNPQRSTUVWXYZabcdefghijkmnpqrstuvwxyz";
private static int WEIGHT=230;
private static int HIGH=100;
private static Random random = new Random();
/**
* 使用系统默认字符源生成验证码
* @param verifySize 验证码长度
* @return
*/
public static String generateVerifyCode(int verifySize){
return generateVerifyCode(verifySize, VERIFY_CODES);
}
/**
* 使用指定源生成验证码
* @param verifySize 验证码长度
* @param sources 验证码字符源
* @return
*/
public static String generateVerifyCode(int verifySize, String sources){
if(sources == null || sources.length() == 0){
sources = VERIFY_CODES;
}
int codesLen = sources.length();
Random rand = new Random(System.currentTimeMillis());
StringBuilder verifyCode = new StringBuilder(verifySize);
for(int i = 0; i < verifySize; i++){
verifyCode.append(sources.charAt(rand.nextInt(codesLen-1)));
}
return verifyCode.toString();
}
public static BufferedImage createVerifyImageNew(String verifyCode){
BufferedImage image=getImage(WEIGHT, HIGH, verifyCode);
return image;
}
/**
* 设置验证码图片
* @param w
* @param h
* @param code
* @return
*/
public static BufferedImage getImage(int w,int h,String code){
int verifySize = code.length();
BufferedImage image = new BufferedImage(w, h, BufferedImage.TYPE_INT_RGB);
Random rand = new Random();
Graphics2D g2 = image.createGraphics();
g2.setRenderingHint(RenderingHints.KEY_ANTIALIASING,RenderingHints.VALUE_ANTIALIAS_ON);
Color[] colors = new Color[5];
Color[] colorSpaces = new Color[] { Color.WHITE, Color.CYAN,
Color.GRAY, Color.LIGHT_GRAY, Color.MAGENTA, Color.ORANGE,
Color.PINK, Color.YELLOW };
float[] fractions = new float[colors.length];
for(int i = 0; i < colors.length; i++){
colors[i] = colorSpaces[rand.nextInt(colorSpaces.length)];
fractions[i] = rand.nextFloat();
}
Arrays.sort(fractions);
g2.setColor(Color.GRAY);// 设置边框色
g2.fillRect(0, 0, w, h);
Color c = getRandColor(200, 250);
g2.setColor(c);// 设置背景色
g2.fillRect(0, 2, w, h-4);
//绘制干扰线
Random random = new Random();
g2.setColor(getRandColor(10, 200));
for (int i = 0; i < 100; i++) {//干扰线的条数
int x = random.nextInt(w - 10);
int y = random.nextInt(h - 20);
int xl = random.nextInt(10) + 1;
int yl = random.nextInt(20) + 1;
g2.drawLine(x, y, x + xl + 100, y + yl + 120);
}
// 添加噪点
float yawpRate = 0.20f;// 噪声率
int area = (int) (yawpRate * w * h);
for (int i = 0; i < area; i++) {
int x = random.nextInt(w);
int y = random.nextInt(h);
int rgb = getRandomIntColor();
image.setRGB(x, y, rgb);
}
shear(g2, w, h, c);
g2.setColor(getRandColor(100, 160));
int fontSize = h-35;
Font font = new Font("Algerian", Font.ITALIC, fontSize);
g2.setFont(font);
char[] chars = code.toCharArray();
for(int i = 0; i < verifySize; i++){
AffineTransform affine = new AffineTransform();
affine.setToRotation(Math.PI / 4 * rand.nextDouble() * (rand.nextBoolean() ? 1 : -1), (w / verifySize) * i + fontSize/2, h/2);
g2.setTransform(affine);
g2.drawChars(chars, i, 1, ((w-10) / verifySize) * i + 5, h/2 + fontSize/2 - 10);
}
g2.dispose();
return image;
}
/**
* 设置线条的颜色
* @param fc
* @param bc
* @return
*/
private static Color getRandColor(int fc, int bc) {
if (fc > 255)
fc = 255;
if (bc > 255)
bc = 255;
int r = fc + random.nextInt(bc - fc);
int g = fc + random.nextInt(bc - fc);
int b = fc + random.nextInt(bc - fc);
return new Color(r, g, b);
}
/**
* 设置噪点的颜色
* @return
*/
public static int getRandomIntColor() {
int[] rgb = getRandomRgb();
int color = 0;
for (int c : rgb) {
color = color << 8;
color = color | c;
}
return color;
}
private static int[] getRandomRgb() {
int[] rgb = new int[3];
for (int i = 0; i < 3; i++) {
rgb[i] = random.nextInt(255);
}
return rgb;
}
/**
* 使图片扭曲
* @param g
* @param w1
* @param h1
* @param color
*/
private static void shear(Graphics g, int w1, int h1, Color color) {
shearX(g, w1, h1, color);
shearY(g, w1, h1, color);
}
private static void shearX(Graphics g, int w1, int h1, Color color) {
int period = random.nextInt(2);
boolean borderGap = true;
int frames = 1;
int phase = random.nextInt(2);
for (int i = 0; i < h1; i++) {
double d = (double) (period >> 1)
* Math.sin((double) i / (double) period
+ (6.2831853071795862D * (double) phase)
/ (double) frames);
g.copyArea(0, i, w1, 1, (int) d, 0);
if (borderGap) {
g.setColor(color);
g.drawLine((int) d, i, 0, i);
g.drawLine((int) d + w1, i, w1, i);
}
}
}
private static void shearY(Graphics g, int w1, int h1, Color color) {
int period = random.nextInt(40) + 10;
boolean borderGap = true;
int frames = 20;
int phase = 7;
for (int i = 0; i < w1; i++) {
double d = (double) (period >> 1)
* Math.sin((double) i / (double) period
+ (6.2831853071795862D * (double) phase)
/ (double) frames);
g.copyArea(i, 0, 1, h1, 0, (int) d);
if (borderGap) {
g.setColor(color);
g.drawLine(i, (int) d, i, 0);
g.drawLine(i, (int) d + h1, i, h1);
}
}
}
}
通过以上方法生成如下图形验证码
1.2使用kaptcha验证码组件
Kaptcha是一个基于SimpleCaptcha的验证码开源项目。
KAPTCHA 参数详解
pom.xml中配置依赖
配置验证码Kaptcha相关设置
import java.util.Properties;
import org.springframework.context.annotation.Bean;
import org.springframework.stereotype.Component;
import com.google.code.kaptcha.impl.DefaultKaptcha;
import com.google.code.kaptcha.util.Config;
@Component
public class KaptchaConfig {
@Bean
public DefaultKaptcha getDefaultKaptcha(){
com.google.code.kaptcha.impl.DefaultKaptcha defaultKaptcha = new com.google.code.kaptcha.impl.DefaultKaptcha();
Properties properties = new Properties();
properties.setProperty("kaptcha.border", "yes");
properties.setProperty("kaptcha.border.color", "105,179,90");
properties.setProperty("kaptcha.image.width", "200");
properties.setProperty("kaptcha.image.height", "90");
properties.setProperty("kaptcha.session.key", "code");
properties.setProperty("kaptcha.textproducer.font.color", "black");
properties.setProperty("kaptcha.textproducer.font.size", "70");
properties.setProperty("kaptcha.textproducer.char.length", "4");
properties.setProperty("kaptcha.textproducer.font.names", "宋体,楷体,微软雅黑");
Config config = new Config(properties);
defaultKaptcha.setConfig(config);
return defaultKaptcha;
}
}
然后在启动类Application中加载配置
@Configuration
@EnableAutoConfiguration
@ComponentScan(basePackages = { "com.lll" })
@SpringBootApplication
@EnableAspectJAutoProxy
@EnableAsync
@EnableScheduling
@ImportResource(locations={"classpath:mykaptcha.xml"})
public class Application extends SpringBootServletInitializer {
public static void main(String[] args) throws Exception {
SpringApplication.run(Application.class, args);
}
}
实现类
package com.example.demo.util;
import java.awt.image.BufferedImage;
import java.io.ByteArrayOutputStream;
import javax.imageio.ImageIO;
import javax.servlet.ServletOutputStream;
import javax.servlet.http.HttpServletRequest;
import javax.servlet.http.HttpServletResponse;
import org.springframework.beans.factory.annotation.Autowired;
import org.springframework.web.bind.annotation.RequestMapping;
import com.google.code.kaptcha.impl.DefaultKaptcha;
public class KaptchaTest {
@Autowired
DefaultKaptcha defaultKaptcha;
@RequestMapping("/defaultKaptcha")
public void defaultKaptcha(HttpServletRequest httpServletRequest,HttpServletResponse httpServletResponse) throws Exception{
byte[] captchaChallengeAsJpeg = null;
ByteArrayOutputStream jpegOutputStream = new ByteArrayOutputStream();
try {
//生产验证码字符串并保存到session中
String createText = defaultKaptcha.createText();
httpServletRequest.getSession().setAttribute("vrifyCode", createText);
//使用生产的验证码字符串返回一个BufferedImage对象并转为byte写入到byte数组中
BufferedImage challenge = defaultKaptcha.createImage(createText);
ImageIO.write(challenge, "jpg", jpegOutputStream);
} catch (IllegalArgumentException e) {
httpServletResponse.sendError(HttpServletResponse.SC_NOT_FOUND);
return;
}
//定义response输出类型为image/jpeg类型,使用response输出流输出图片的byte数组
captchaChallengeAsJpeg = jpegOutputStream.toByteArray();
httpServletResponse.setHeader("Cache-Control", "no-store");
httpServletResponse.setHeader("Pragma", "no-cache");
httpServletResponse.setDateHeader("Expires", 0);
httpServletResponse.setContentType("image/jpeg");
ServletOutputStream responseOutputStream =
httpServletResponse.getOutputStream();
responseOutputStream.write(captchaChallengeAsJpeg);
responseOutputStream.flush();
responseOutputStream.close();
}
}
使用Kaptcha生成图形验证码
二、针对ip进行访问次数限制
2.1获取真实的IP地址
public String getRemoteIp(HttpServletRequest request) {
String remoteIp = "";
remoteIp = request.getHeader("x-forwarded-for");
if (remoteIp == null || remoteIp.isEmpty() || "unknown".equalsIgnoreCase(remoteIp)) {
remoteIp = request.getHeader("X-Real-IP");
}
if (remoteIp == null || remoteIp.isEmpty() || "unknown".equalsIgnoreCase(remoteIp)) {
remoteIp = request.getHeader("Proxy-Client-IP");
}
if (remoteIp == null || remoteIp.isEmpty() || "unknown".equalsIgnoreCase(remoteIp)) {
remoteIp = request.getHeader("WL-Proxy-Client-IP");
}
if (remoteIp == null || remoteIp.isEmpty() || "unknown".equalsIgnoreCase(remoteIp)) {
remoteIp = request.getHeader("HTTP_CLIENT_IP");
}
if (remoteIp == null || remoteIp.isEmpty() || "unknown".equalsIgnoreCase(remoteIp)) {
remoteIp = request.getHeader("HTTP_X_FORWARDED_FOR");
}
if (remoteIp == null || remoteIp.isEmpty() || "unknown".equalsIgnoreCase(remoteIp)) {
remoteIp = request.getRemoteAddr();
}
if (remoteIp == null || remoteIp.isEmpty() || "unknown".equalsIgnoreCase(remoteIp)) {
remoteIp = request.getRemoteHost();
}
return remoteIp;
}
对于通过多个代理的情况,我们会得到例如:112.28.176.62,10.102.201.130 这样的结果,那么第一个IP为客户端真实IP,多个IP按照’,’分割 ,以上代码可以获取到用户没有进行伪造的请求。
如果运行这段代码后仍然获取的是Nginx代理地址的话,说明需要对Nginx进行配置。
在代理的每个location处加上以下配置:
proxy_set_header Host $http_host;
proxy_set_header X-Real-IP $remote_addr;
proxy_set_header X-Forwarded-For $proxy_add_x_forwarded_for;
proxy_set_header X-Forwarded-Proto $scheme;
Nginx反向代理后,Servlet应用通过request.getRemoteAddr()取到的IP是Nginx的IP地址,并非客户端真实IP,通过request.getRequestURL()获取的域名、协议、端口都是Nginx访问Web应用时的域名、协议、端口,而非客户端浏览器地址栏上的真实域名、协议、端口。
Nginx的反向代理实际上是客户端和真实的应用服务器之间的一个桥梁,客户端(一般是浏览器)访问Nginx服务器,Nginx再去访问Web应用服务器。对于Web应用来说,这次HTTP请求的客户端是Nginx而非真实的客户端浏览器,如果不做特殊处理的话,Web应用会把Nginx当作请求的客户端,获取到的客户端信息就是Nginx的一些信息。
解决这个问题要从两个方面来解决:
1. 由于Nginx是代理服务器,所有客户端请求都从Nginx转发到Tomcat,如果Nginx不把客户端真实IP、域名、协议、端口告诉Tomcat,那么Tomcat应用是永远不会知道这些信息的,所以需要Nginx配置一些HTTP Header来将这些信息告诉被代理的Tomcat;
2. Tomcat这一端,不能再傻乎乎的获取直接和它连接的客户端(也就是Nginx)的信息,而是要从Nginx传递过来的HTTP Header中获取客户端信息。
原链接:https://blog.csdn.net/it_0101/article/details/78390700
2.2设置访问限制
根据IP和手机号码针对该接口请求:
1、同一号码在同一天内只能发送不超过5条验证码;
2、同一IP在1分钟内出现3次以上
3、同一IP在30分钟内超过5次
4、同一IP在24*60分钟内出现10次以上
5、同一IP在48*60内出现20以上
将以上IP列为黑名单;黑名单可以手动删除;
经过这次的安全访问限制,短信盗刷的请求在图形验证码校验时就被拒绝了,目前还没有黑名单生成。产品方面也针对其他类型的图形验证码方案进行评审,下次说不定就是人脸识别了。。。
版权声明:本文为CSDN博主「Mia_li」的原创文章,遵循 CC 4.0 BY-SA 版权协议,转载请附上原文出处链接及本声明。
原文链接:https://blog.csdn.net/sinat_23324343/article/details/80854034
三、新昕科技短信防盗刷方案
提高图片的复杂度及增加简单的Ip规则,包括滑动验证其实都容易被黑客破解, 只有新昕科技的无感短信防轰炸,在真正无感的前提下,彻底解决短信轰炸问题。
新昕科技 www.newxtc.com ,创始团队来自百度旗下去哪儿、易宝支付、联动优势、高阳捷讯(19pay)等支付及航旅知名企业,历时3年时间,在价值百万的风控引擎基础上 ,训练出“防短信轰炸”智能模型,彻底解决“安全”与“用户体验”的矛盾,产品经理只需专注用户体验,无需为安全让步。
1)无感:去类12306、对缺口拼图、拖动等所谓人机验证有感方式。
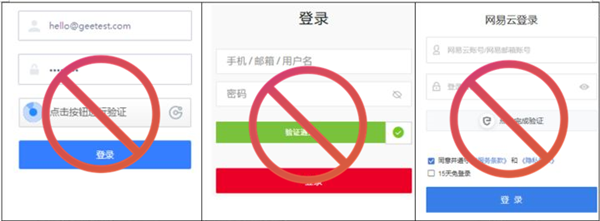
化繁为简,简单到只需要输入手机号,还产品本来面目
 |
 |
 |
2)保障:攻防对抗大数据训练的 AI模型,去前端交互验证方式,后端防御确保短信安全。
比如,同一个IP ,即使有1万个正常用户同时共同使用,可以确保放行,但常规的防控大多数被误拦。
反之,攻击者控制1万台主机,1万个不同IP、手机,也保证拦截,但常规的防控对此无能为力。
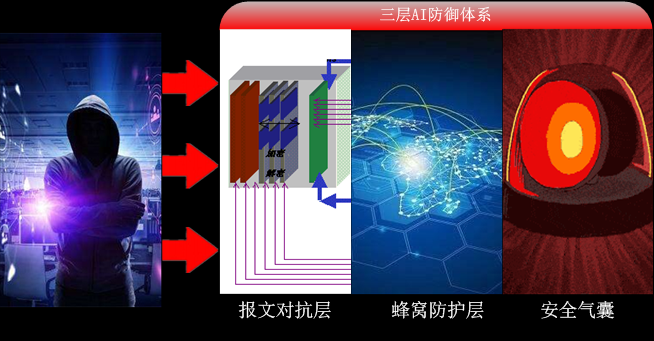
如何做到的, 基于三层AI防御体系,
“报文对抗层” 在最外层应用加解密及混淆技术,对抗普通的攻击,
“蜂窝防护层” 由时空主体组成蜂窝,确保被攻击后“蜂窝”之间互不影响,缩小受影响的范围,
“安全气囊” 在确保老用户不受影响下, 根据攻击规模自动启停并进行动态控制。
3)高效:价值百万的风控引擎浓缩的10M “短信防火墙”安装包,本地部署运行,毫秒级响应。
| 避免“云模式”的网络延时问题,导致滑动条出不来等情况 |
 |
|

关键技术说明:
“悬浮式指标引擎”:加载AI模型,悬浮于磁盘超高速运行,随输入的业务数据生成统计指标,提供给决策引擎做进一步分析处理,
“决策引擎”:加载“短信防轰炸”AI模型和指标后,和输入的业务数据流做逻辑判断后,输出风险结果,响应速度达到恐怖的1毫秒。
总结:随着互联网技术的不断发展,我们每日都离不开与互联网的交互。短信验证码作为互联网交互中的重要环节,保卫着网站的安全以及我们的信息安全。用户体验差、毫无安全性可言的图片验证码将退出历史舞台,未来将会是安全与体验双重保障的验证码的时代。